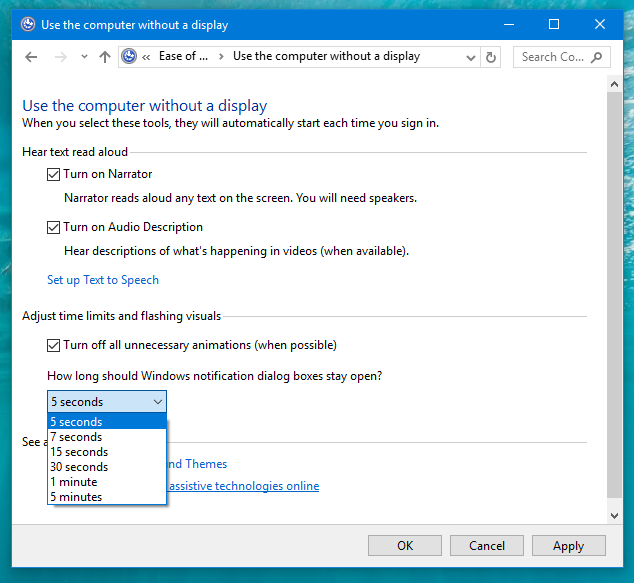
Managing Monitors is vital in a Computer System setup as the Monitor is responsible for displaying the data and the information that is created and stored on your computer. Understanding the different features and attributes of a Monitor like its Size, Display Technology used, Native Resolution, Power Consumption, Colour Calibration etc. is necessary for configuring the Monitor to display that perfect picture on your Screen. This post explains all the aspects related to the Monitor so that you are able to understand your Display Screen and can make better Monitor buying or Monitor Management decisions.
Monitor Technologies (CRT Vs LCD Vs LED)
LED and LCD are the 2 most common Monitor technologies available in the market in recent times. When it comes to buying a Computer Monitor LED or LCD becomes a matter of discussion. While CRT monitors are more of a old technology Touchscreen Display is the latest addition to the Monitor technology. Lets understand what these Monitor technologies mean and their difference

CRT, LED ,LCD Touchscreen Technologies Supported for Computer Monitors
- LCD (Liquid Crystal Display) also called as flat-panel Displays widely used in Laptops uses compact fluorescent lights to brighten up the Screen. LCD Displays typically have 2 sheets of polarising material and liquid crystal solution between them that can be induced by electric field to either pass the light or block the light. The intensity of light that is passed through each green, blue and red pixel can be controlled which can display a wide variety of colours and much more detailed picture. LCD Monitors are much more thinner than the CRT Monitors and are available in a variety of sizes like Widescreen as well as Fullscreen Displays. Light weight, clear picture, slimmer design are some of the advantages of LCD displays which makes LCD Monitors a preferred choice of consumers. Whether using to create a simple presentation or using the Monitor for video conferencing, LCD Monitors are suitable for all purposes and are the most commonly used Display for Computer Monitors, Televisions and Laptops.
- LED (Light Emitting Diodes) Monitors on the other hand are basically LCD Monitors which use a new backlighting technology which uses LEDs instead of the fluorescent tubes that are used in LCD Monitors to illuminate the screen. Apart from arranging horizontally or vertically LEDs can be arranged across the Screen as well as on the edges. This ability of the LEDs helps in better light distribution for a great quality picture as well as making the Monitors even more thinner and lighter. Apart from these below are some of the highlights of the LED monitors
- Draws less power making it very energy efficient.
- Can produce more accurate picture with higher contrast ratio and more colours
- Very durable and lasts long
- Do not heat much while running for long hours.
- CRT (Cathode Ray Tube) is another Monitor technology which was used prior to LCD or LEDs. With advancement in technology, CRT monitors are also capable of producing higher resolutions and good quality picture. However they are very bulky and heavy in size and can occupy a lot of space. Another disadvantage of CRT Monitors is that it can consume significant amount of Power compared to LCD or LED Displays..With the advent of LCD and LEDs, CRT Monitors are loosing its ground and are not the preferred choice for many.
- Touchscreen Monitors : Owing to the different devices used like Smartphones, Tablets Notebook, Touchscreen Monitors are nowadays in demand. Using Touchscreen Monitor you can interact with your Computer using touch of your hand.. The major advantage of the Touchscreen Monitor is that the customers need not know how to use the computer. They can simply touch the screen and select their required options and use the computer. Touch screen Monitors are also of great help for people with disabilities who cannot use Mouse or Keyboard for operating the Computer.
Standard Display Connectors
You can connect a Monitor to your PC using a range of different cables available. HDMI, DisplayPort, DVI and VGA are the four most popular display connection types available to connect your monitor to your computer. Apart from VGA, all the other are digital connectors. If you are connecting a high resolution 4k Monitor or have any specific needs then you should be very careful while selecting the type of display connection. Described below are the different type of connectors and where they are suited the best

VGA, HDMI , DVI , Displayport and other Sockets supported for Computer Monitor Data
HDMI Connector
HDMI (High Definition Multimedia Interface) is the connection of choice for most of the Multimedia devices. It carries video as well as audio down the same cable. It is used on a variety of devices like Television, Computer, Laptops, Tablets, Mobile devices, Gaming Consoles etc. The cable is cheap and easy to use as well. HDMI connector comes in 2 versions HDMI 1.4 and the latest being HDMI 2.0 . HDMI 2.0 is becoming more significant due to the advent of 4k monitors as it supports the resolution and the refresh rates required for these Ultra high Definition Display Screens.
DisplayPort Connector
DisplayPort is the most preferred connection format for connecting a Monitor to the Computer. The current DisplayPort version 1.2 supports 3840 x 2160 resolution video and a higher refresh rate of 60 Hz. Higher refresh rates are of interest when using Monitors for gaming purpose. One of the main advantage of DisplayPort is its ability to support Multiple Monitors connections through Multi-Stream Transport (MST). DisplayPort can also carry audio and are of the same price as HDMI. Similar to HDMI, DisplayPort can also carry audio. A newer version 1.3 is coming up with higher resolution to support 8K monitors (7680 x 4320).
DVI Connector
Digital Video Interface (DVI) is another type of connector used to connect a Computer Monitor. DVI connectors comes in 2 types namely Single Link which supports 1920 x 1200 resolution and dual link which supports 2560 x1600 resolution. So if you have a Monitor with higher resolution than this, you need to use HDMI or DisplayPort.
VGA Connector
The only analog connector, VGA (Visual Graphics Array) also referred to as RGB connection or D Sub is the oldest one. Even though it is capable of higher resolutions, this video only connector however it is not suitable for the modern LCD Monitors. 1920 x 1080 is the maximum resolution that a VGA connection can support.
How to connect a Monitor to a Desktop PC
Once you have selected the Monitor and the suitable type of the connection that you want to use, connecting a Monitor to a PC is fairly simple and straightforward. Just connect the cables and your are ready to view the digital world. The below procedure outlines the steps to connect a Monitor to your Desktop PC.
- Before making any connections be sure that your Computer is Switched Off.
- Select the type of connection required for your Monitor and which is supported by your PC. You can select between VGA, HDMI,DVI or DisplayPort.
- If your Monitor supports a different connector that your Computer then you will need a adaptor for conversion. You will need a HDMI to DVI adapter if your Laptop supports HDMI and your Monitor supports DVI. Likewise there are other adapter like DVI-to-HDMI, HDMI-to-VGA etc.
- Connect one end of the Monitor cable to the Monitor and the other end to the appropriate port of the PC. Make sure that the cable is inserted firmly and correctly. For VGA or DVI cables, tighten the screws on the side of the connectors. HDMI and DisplayPort cables can be inserted like USB cable.
- Locate the Power supply cable. Insert one end to the Monitor and plug the other end to the Power Supply.
- Switch On the Power Supply and Switch On the Monitor.
If successfully connected, the Monitor will display the Computer data. If you see any kind of distortion or any unstable images, check if your cables are connected correctly or try using a different connector type.
Setting Up Multiple Monitors
There are various reasons to use more than one Monitor while working on a Computer. Adding another Monitor to your Computer setup gives you more space to work that can be utilised to view multiple programs simultaneously. Multi-Monitor setup can increase your productivity as you spend less time in switching between the applications and more time actually working on it. There are many scenarios where Multiple Monitors can be used as listed below
- Multiple Monitors makes it easy to work on multiple applications at a time. It is very helpful when working with applications where you need to constantly refer to something while working on the another application e.g. referring to a document while writing an article, referring to a document while typing an email or simple comparing 2 excel spreadsheets. Dragging the application to refer to another Monitor while working on the primary one will save you a lot of time and reduce copy/paste errors caused by opening and closing multiple applications on a single Monitor.
- You need to constantly Monitor more than one applications while working . Share market applications can be one of the examples. By displaying the application on separate Monitors you can constantly Monitor the applications simultaneously with just a glance and take decisions effectively.
- Displaying different view of same application e.g. coding environment has different views. There is a view where you can write the code while there are other views that are activated when you compile the code or link the code. Many coders find it easy to drag and drop one of the views on the other Monitor so that they have that extra space while coding and can easily view all the errors while compiling or running the application .
- Many people like to view videos while working. You can just play the video on one Monitor while you are working on the other.
- Multiple Monitor setup is a desirable feature while playing Computer games. There are many multi person games where you need to extend your game to the second Monitor.
Turn Off Laptop Screen and Project Primary Display onto External Monitor
How to connect Multiple Monitors to a Computer
Now that you have decided that you want to extend your workspace and add another Monitor to your Computer setup, you need to first check if your Computer supports Multiple Monitors. Follow the below steps to add the additional Monitor to your Setup
- Check if Multi Monitor is supported : You will need two Monitor or video output connection on your Computer – one for each Monitor. The modern day graphics card generally support two or more monitors and motherboards generally support one or two. Make sure you have appropriate graphics card and CPU to support Multi Monitor setup.
- Plug the Monitor in the appropriate Port : Connecting a additional Monitor is fairly simple. Just Plug in the Monitor cable in the appropriate port of Graphics card. You can refer the steps mentioned above to connect a Monitor to the PC. If connection is successful Windows will be able to detect your additional Monitor.
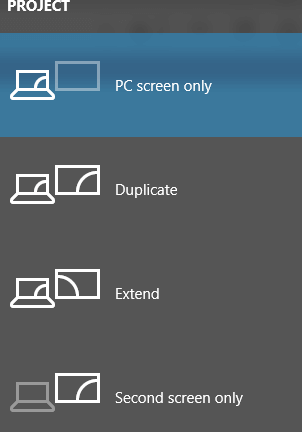
- Select the Monitor Mode : Once connected, Windows will allow you to select the Monitor Mode. You can choose how you what is displayed on the monitor by selecting the Multiple Displays menu. You can Duplicate the Screen or Extend the Screen . You can Duplicate the screen if you want to share what is being displayed on the Monitor with some one else. Extend the Monitor if you need some extra space to work. Even if a external Monitor is connected you can also individual select only one Monitor to work on. This is helpful if you want to connect external Monitor to your Laptop and use that Monitor as your primary Display.
- You can Use the Widows Key +P keyboard Shortcut to view different view modes and switch between different Modes.
- If using a Laptop the newly connected external Monitor might be automatically detected or you might have to manually activate it using a Keyboard key. Generally the Fn Key is used to detect the external Monitor however it various from manufacturer to manufacturer. You can check if there is a Monitor symbol on any of your Fn keys and use that key or check the user manual for the appropriate key combination.
- Configure the Second Monitor: The additional Monitor connected need not be of the same size or resolution as the existing Monitor. In Windows you can use the Display settings to view and to adjust the Screen Resolution, Background, Power Options and the other Display parameters of the second Monitor. You need to just select the Monitor number and Windows allows you to make the changes applicable for that Monitor.
- Manage Dual Monitors : You can use the default Windows features to manually manage your multiple Monitors or you can take the help of software like Dual Monitor Software for Windows 10 to manage your Dual Monitors with ease.
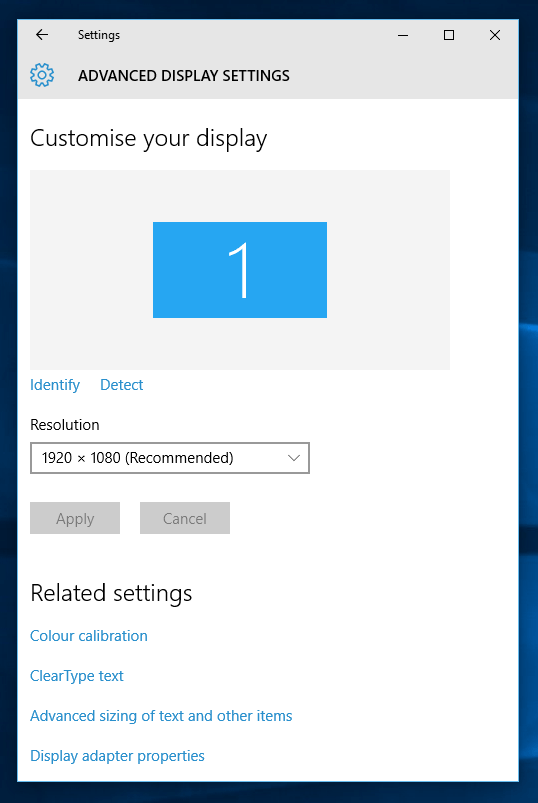
Identifying Monitor Number
When working with Multiple Monitors you can easily forget or confuse between which one is Monitor number one and which one is the Monitor number two or three. Windows 10 provides you a Identify option which when clicked will display the monitor number on the Screen. The option available on the Advanced Display Setting screen.
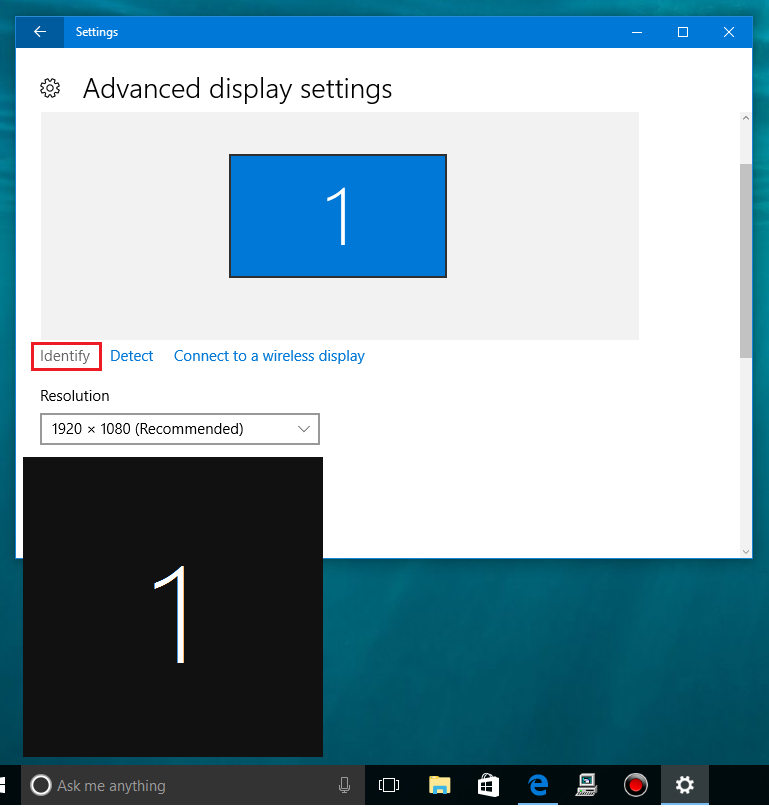
Identify the Monitor Number in Windows 10
Once you get this monitor number you can then use that number to select the display and customise the Monitor. Due to inbuilt support and capabilities using Dual Monitor Computer in Windows becomes very convenient and can be managed with ease.
Calibrate your Monitor
Once your PC is connected to your Desktop or your Laptop you can configure it as per your requirements. You need to adjust the Screen Brightness and Contrast , Gamma values and Colour balance so that you can view an accurate picture with minimum strain on your eyes. But how do you Calibrate your Monitor ? Windows provides an in-built tool using which you can Calibrate your Monitor.The Windows 10 color Calibration utility provides a step by step guidance and helps you configure the settings with accuracy. The below steps outlines the procedure to access the Calibration wizard in Windows 10. Before starting the process of colour calibration make sure you perform this in the day time and the light in your room is appropriate. The room should not be too dark, nor it should have any direct sunlight falling on the screen which may not help you to view the correct brightness or contrast levels correctly. Start your Monitor at least 30 minutes before you start the calibration process.
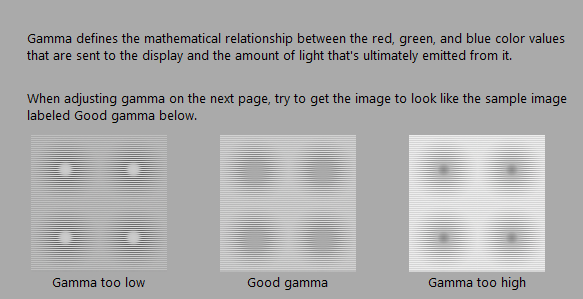
Calibrate your Monitor in Windows 10 by Adjusting the Gamma Values
- Select Display Settings Option : Right click on the desktop and select Display Settings from the Menu
- Click on Advanced Display Setting Link : From the Display Settings page, Select advanced Display Settings Link
- Select Color Calibration link : On the Advanced Display Settings Screen select the Color Calibration link
- Start Calibration Wizard : The color Calibration tool is a wizard and will guide you through the process of adjusting the different settings. Use the Monitor hardware buttons to set the basic colours for your screen. If possible set the default factory settings to start with and click ‘Next’ button on the Wizard.
- Follow the calibration wizard to adjust the Gamma values, brightness, contrast and color balance . The wizard will give you a guidance on what are considered to be good values.
- Compare the changes : Once you follow the instruction, you can also compare the current and the previous settings. You can also skip any setting if you want to.
- Apply the Settings : Once you are sure about the changes you can apply the changes. if not happy then you can also select the cancel option and restore the previous settings.
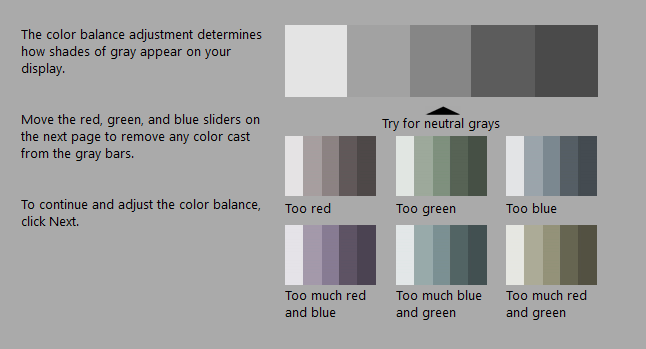
Calibrating the Monitor by Adjusting the Color Balance in Windows 10
At the end of the wizard, there is a option to launch the Clear Text Type Tuner. Clear Text Type Tuner is another utility provided in Windows 10 to adjust the text that is displayed on the Screen. You just need to follow the wizard and make sure that the text displayed is best suited for your viewing. In Windows 10 you can also access the Clear text Type Tuner by selecting the Display Option from the Control Panel for tuning the text displayed on your Monitor.
Change Colour Depth in Windows 10 (16 Bit or 32 Bit)
There is no direct option to change the color depth to 16 bits in Windows 10. However if you have to use 16 bit color depth on your Monitor then you need to run your program or application in compatibility mode and reduce the color depth. Below steps provides the procedure to run the application in compatibility mode and then reduce the color depth
- Right click on the application shortcut created and select Properties
- Select Compatibility tab on the Properties Screen displayed.
- Check the Reduce Color Mode option checkbox and select the appropriate value of 8 bit or 16 bit as required and click Apply button.
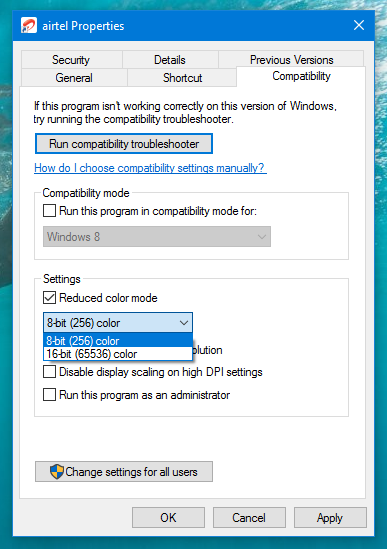
Run Application in Compatibility Mode to Reduce Color Depth in Windows 10
Note : Running any program in the compatibility mode might not run smoothly and might result in Screen freeze or flickering. Make these changes only if you have and there is no other option.
Rotate your Monitor
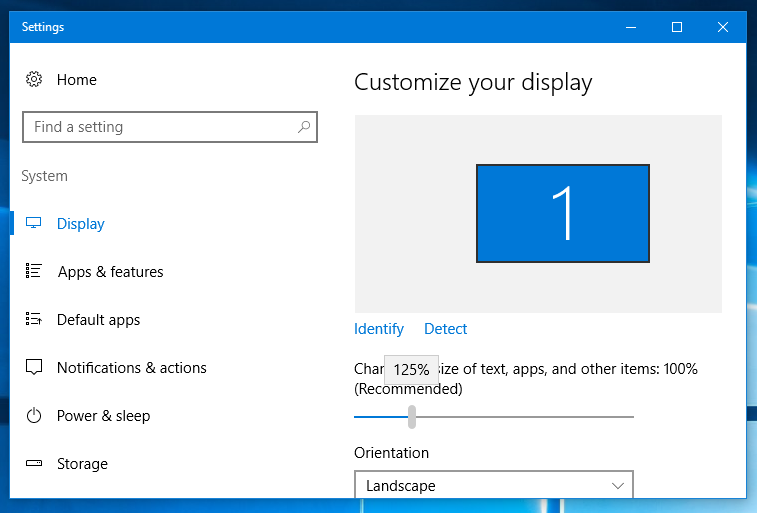
Monitor Orientation is the way in which the page appears on the Display Screen. Portrait and Landscape are the two most common orientation types that Windows supports. Windows sets Landscape mode as the default Orientation type. When the screen is in Landscape mode, the width is more and height is less. For most of the computer work or while watching videos Landscape mode is preferred and most convenient.
Windows allows you to change orientation of Monitor from the default Landscape to Portrait by selecting the Portrait option from the Display Settings Screen as shown in the below screenshot. In a Portrait mode the page has more height than width. There are many scenarios where a Portrait Mode is more suitable e.g. when working with multiple Monitors, you can use the extra Monitor to view the image or article in a portrait mode. Authors or readers find portrait mode convenient as it is a more natural representation of a book. Some games like arcade supports vertical display as the game needs more vertical space and hence the preferred orientation is Portrait while playing such games.
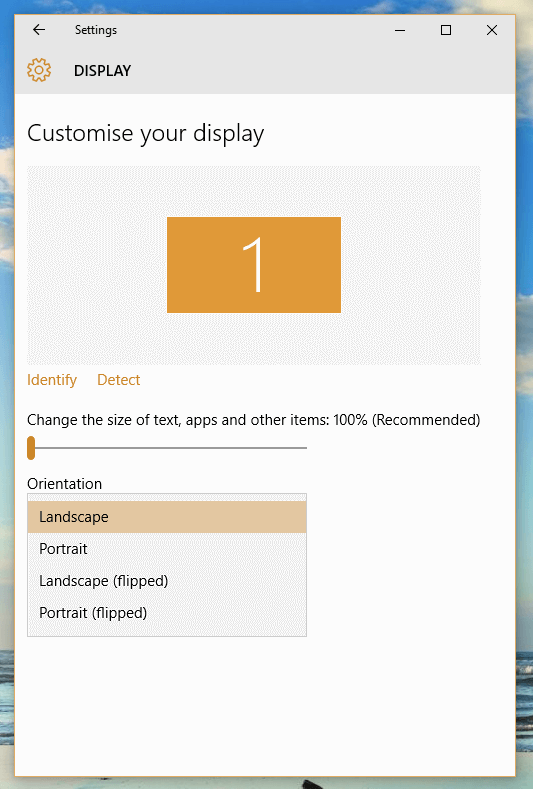
Change Monitor Orientation on Windows 10
Apart from these basic orientation types, Windows also provides 2 additional options namely Landscape (flipped) and portrait (flipped) to rotate your screen upside down. You can use the Ctrl +Alt+ arrow keys shortcut to rotate you screen or bring is back to your preferred position. If you are using a Tablet or a Smartphone then there is a option to auto rotate the screen depending on how you are holding the Tablet or the phone. You can enable the auto rotate or disable it as per your requireCents. .
Personalise your Desktop in Windows 10
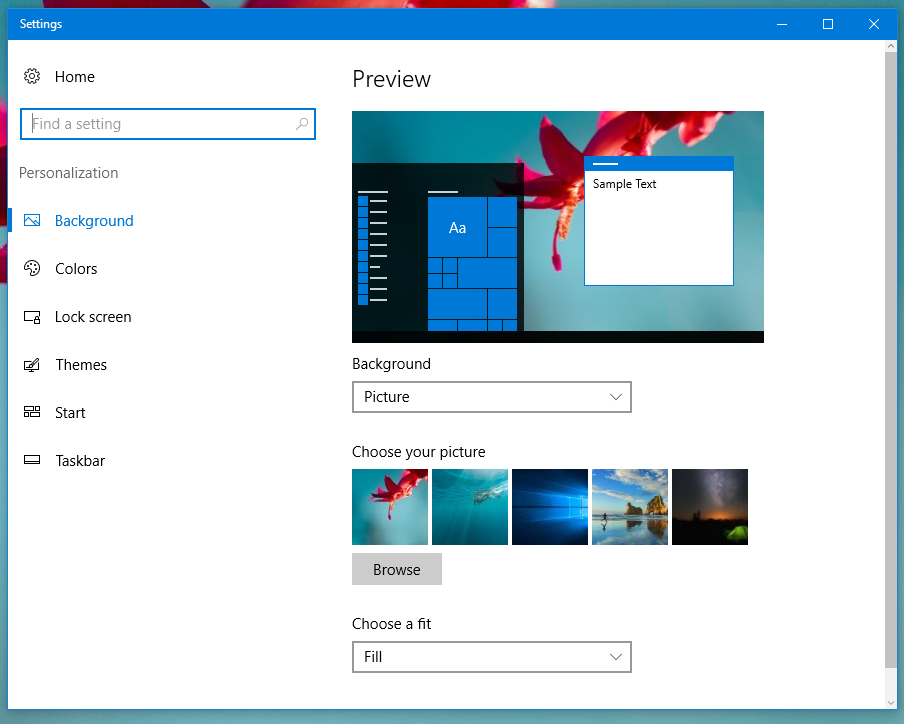
Personalising your desktop can be a kind of signature to reflect your personality as well as the kind of work you are doing. You spend many hours of your day and night working on your Computer or Laptop and you will be surprised at how many hours you spend looking at your Monitor. So why not just make this Display pretty enough to look at ? Windows 10 provides various ways as mentioned below in which you can beautify as well as customize your desktop so that you can access your required application or data as quick as possible. To access the personalisation option in Windows 10, Right Click on the Desktop and select Personalize from the Menu displayed. The Settings Screen displays various options to change your background, change colour, configure the Start Menu, select a Theme etc. each of which is explained in short below.
Various Options Provided by Windows 10 to Personalize your Desktop
Setting Backgrounds
Windows 10 allows you to set a picture, a slideshow or define a solid colour as your background. You can choose a picture from the default list of picture provided by Windows. You can also use the ‘Browse’ button to locate any picture of your liking on your Computer and set it as your background. Once you choose the picture you need to select the way in which you want it to appear on the screen. Choose from the Fill, Fit, Stretch ,Tile, Centre and Span options from the Choose a fit drop down list.
Similarly you can choose a collection of photographs if you want to configure a slideshow as your background. Choose from the collection from the default ones or you can locate a photograph only folder using the Browse option to display pictures of your choice. As it is a slideshow, you can also set the time interval when you want to the picture to change. Windows also offers the option to display the picture sequentially or allows you to shuffle the picture randomly. Lastly you can also select a basic solid colour as your background. You can check how the background will appear in the Preview section of the Settings Screen.
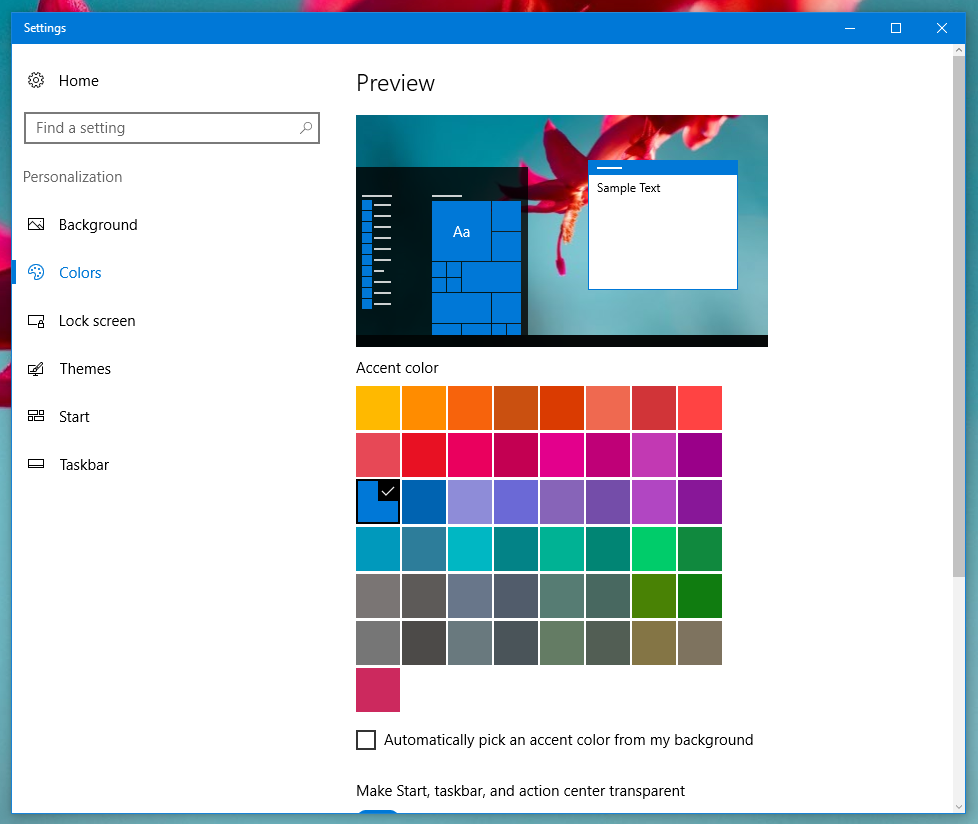
Colouring your Icons, Menus and Taskbar and Title Bars
Windows allows you to choose your colours for various User Interface elements like the Taskbar or the Title bars. You can also make the Taskbar and Action Centre transparent and if transparent any ascent colours selected won’t be applicable to these UI elements. Choose the dark mode that Windows recently introduced or use the High contrast themes if you a more interested in a dark coloured Screens. These options will display the black colour at the background instead of the Standard White colour.
Personalize the Desktop using a Colour Scheme in Windows 10
Customize Lock Screen
Lock Screen is the screen that appears when you Sign In to your user account. You can customize this Screen by selecting a picture of your choice or setting up a slideshow similar to the way you customized the Desktop background. Apart from these settings, Windows provides a way to display the information of the applications that are running while you lock the screen. You can select application and display its detail status or configure multiple applications for a quick view of current status of the application which is useful when you are either downloading any file or doing a virus scan.
Set a Background Theme
A theme is a collection of background picture, colour, sound, and screensaver all put together in one package. Instead of setting each option you can select a theme which will manage all these settings. You can access the Theme settings by selecting the Theme Settings link . Apart from the themes provided by default, Windows allows you to download different Themes from online and use it as requited.
Configure the Start Menu
Start Menu displaying Tiles is one of the new features of Windows 10 . You can customize various aspect of the Start Menu as mentioned below. Each option can be enabled or disabled as per the individual requirements.
- Display More Tiles – Enabling this option will add increase the width of the Start menu. This option adds a width equal to a column of the Start menu. You can enable this option if you want to add more applications to your Start menu.
- Show Most used apps: You can enable this option to display the your most used apps in the Start Menu for quick access.
- Show recently added Apps: This option will group and display all the recently added apps in the Start Menu.
- Enable Start Menu in full screen Mode: When you enable this option the Start menu will take the entire screen space when opened. This option is more relevant when you using the Monitor in Tablet Mode.
- Choose the folder to add to Start menu: If you use any folder like Display Setting or Documents folder more often then you can add it to the Start menu for a quick access instead of locating the folder in the file explorer. Windows provides you a list of various folders which can be added to the Start Menu.
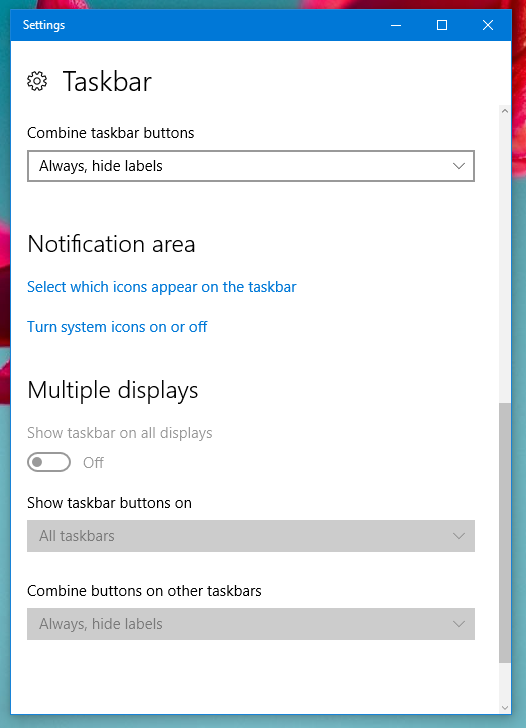
Personalize Notification Area and Taskbar on Multiple Displays in Windows 10
Configure the Taskbar
Taskbar is one of the most important UI (User Interface) elements on the desktop. Apart from allowing you to access applications quickly, it also is a place from where you can access the Notification centre, the Action Centre and other options like Network settings, date and time settings etc. Windows allows you to configure almost every aspect of the Taskbar to suit your style and help you in saving your search time and efforts. Below are the some of the Taskbar options that you can customize on your Desktop.
- Taskbar Location : Windows allows you to choose where the Taskbar will appear on your Desktop. You can choose from Bottom, Right, Left and Top options.
- Taskbar Visibility : You can enable the Hide Mode to automatically hide the Taskbar. The Taskbar will be auto visible when your mouse moves in that area. There are two option, one to hide the Taskbar in Desktop Mode and the other to hide the Taskbar in Table mode.
- Grouping the Options in Taskbar: Using this option you can combine the Taskbar options in case there are too many.
- Configuring Notification Area icons : You can configure the applications displayed in the Notification area of your Taskbar.
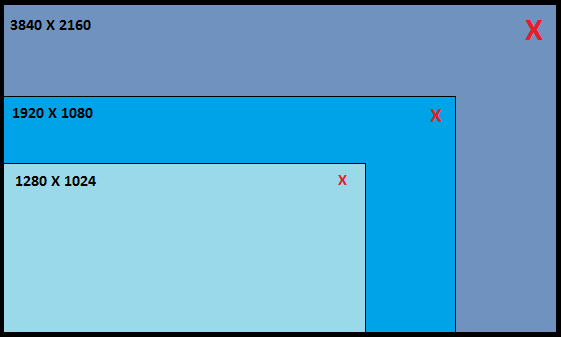
Screen Resolution of the Monitor
Screen Resolution can be regarded as one of the attributes of the Monitor that directly impacts the quality of image that is displayed on the Screen. So what is Screen Resolution ? Screen resolution is defined as the number of pixels that a Monitor can display horizontally and vertically. Screen Resolution is specified in Width x Height e.g. if your Screen resolution is 1280 x 920 that means that the Monitor can display 1280 pixels horizontally and 920 pixels vertically. It also means that 1280 x 920 = 11,77,600 which is the maximum number of pixels that the Monitor can display. The common Screen Resolutions are 800 x 600,1280×720, 1920 x 1080,1280 x 960. Nowadays the Ultra High definition Monitors commonly like as 4k Monitors can support Resolution upto 3840 × 2160. Generally Monitors including the LCD Displays are fixed-pixel Displays and can display a maximum of fixed amount of pixels. Most of these displays can convert the source image or video to fit its own resolution.
The various resolution options that a Monitor can support depends on the graphics card installed and the type of Monitor used. The higher the resolution of the Monitor the more number of pixels that can be displayed resulting in a clearer and more accurate picture. What is my Screen Resolution becomes first and most important question to ask when creating images or recording a video. Windows by default detects the Resolutions that are supported by the graphics card and selects the one that is best for your Monitor by default and is displayed on the Display Setting Screen.
Advanced Display Settings of Windows 10
Windows displays a list of resolutions supported by the Monitor and you can change the Screen Resolution by selecting the options from the list. You can also Change Monitor Resolution with Desktop Shortcut on Windows 10 . The new Resolution is applicable for all the Users of the Computer. Windows by default does not provide any option to change the Resolution of the Monitor for each User.
When describing Screen Resolutions many times the number of pixels is followed by p or a i e.g. 1024p or 960i. ‘p’ means for progressive scan and ‘i’ stands for interlaced scan which basically defines how the picture is painted on the Screen. A picture is painted line by line on the Screen. While interlaced paints all the odd lines first and then the even lines, progressive paints the lines in sequence all at once. Many LCD and LED Monitors can detect an incoming I signal and convert it into P signal.
Screen Resolution – Does Size of the Monitor matter ?
If the Monitor size is bigger it does not necessarily mean that the Monitor has a higher Resolution. The Resolution that a Monitor can support depends on the graphics card installed and the type of Monitor being used. The highest Resolution a graphics card can support is limited by the Monitor because even if the graphics card has the ability to support the higher resolutions, the Monitor should also have the capability to display that many pixels. So a CRT monitor will not be able to display any high definition content however powerful the video card may be.
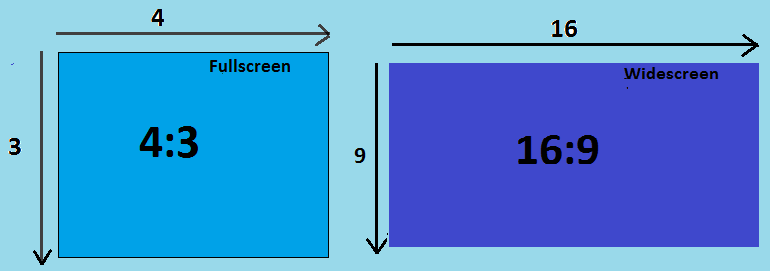
Display Resolution Vs Monitor Aspect Ratio
While Display Resolution defines the total number of pixels the Monitor can display, the Aspect Ratio of Monitor is defined as the ratio between the width of the image to the height of the image that the Monitor can display. Screen Resolution is important for creating high quality image or a video. Resolution defines the amount of image information or image data that the Monitor can display and hence more the data and information, more accurate will be the picture.
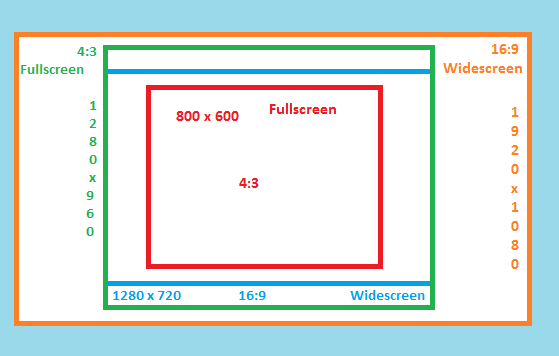
Common Aspect Ratio and Screen Resolutions of Monitor
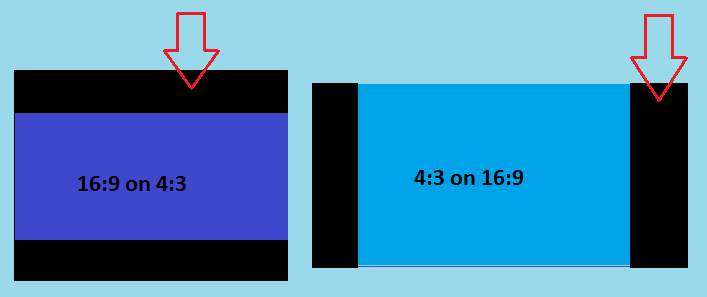
Aspect Ratio of Monitor defines how the Image will be displayed on the Screen. It will be displayed Fullscreen if the aspect ratio of the Monitor is 4:3 or Widescreen if the Monitor Aspect Ratio is 16:9. Any mismatch in the Aspect ratio of the source using which the video is shot like camera and the Display destination like Monitor will result in image distortion of the image or the video will be cut to fit the Aspect ratio of Monitor. Aspect ratio becomes important while converting or resizing the images or videos. Many video websites like YouTube will allow uploading of videos with certain Aspect Ratios. If your video is not as per the specifications, then the video will be displayed with vertical or horizontal black bars to fill in the extra space. Monitors supports different Aspect Ratios and some of the most common ratios are 4:3, 16:9, 16:10
Monitor Refresh Rate Vs FPS
Monitor Refresh Rate is measured in frequency (Hz) and is defined as the number of times per second your Monitor can redraw the Screen. if your Monitor Refresh Rate is 60 Hz then your Monitor can redraw the entire Screen 60 times in a second. Refresh rates are more important for CRT Monitors as CRT monitors with lower refresh rates caused flickering of images which can be harmful to the eyes if viewed for longer durations. Since LCD monitors just change their crystal structure and do not Blank out the screen, there is no specific minimum refresh rate required. However modern day LCD Monitors generally support a refresh rate of 60 Hz which is good enough for viewing as well as playing games.
FPS means frames per second is the number of frames the graphics can produce per second. The FPS value depends on the CPU and the GPU (Graphics processing unit) of your computer. A more powerful CPU and GPU higher is the FPS value. FPS is used to measure the performance of two computers specifically gaming computers. It is a benchmark to measure different parameters of the computers like drivers, hardware and games etc.
Even though Refresh Rate and FPS are two different parameters, they both are interlinked and effect each other. If your Monitor has a lower Refresh Rate than FPS value e.g. Refresh Rate of 80 and your FPS is 120, means that your CPU can produce 120 frames per second however the Monitor will be able to display only 80 frames per second. Refresh Rate does affect FPS and can limit its value. When Refresh Rate and FPS are not in sync e.g. FPS is either higher or lower than the Refresh Rate, it produces glitch in the image which is also known as Screen tearing. Screen tearing is avoided by synchronising the Refresh Rate and the FPS by configuring the GPU of the Computer to produce the frames in sync with the Monitor Refresh Rate. This process is also known as vertical synchronisation or Sync.
If you are a gaming person then refresh rate is of more relevance as its affects gaming. Higher the Refresh Rate better is motion resolution resulting is less image blurs. Higher refresh rate also reduces screen tearing and also provides better responsiveness in games. Nowadays gaming Monitors have higher refresh rates like 120 or 240 Hz. For non gaming consoles a refresh rate of 60 Hz is convenient.
Change Refresh Rate of Monitor in Windows
Windows allows you to view or change the Refresh rate of your Monitor. Similar to Screen resolution, Windows displays a list of refresh rates supported for a particular resolution. if you have purchased a higher Refresh Rate Monitor then you might want to view if Windows have actually configured that Refresh Rate. It is advisable to use the highest Refresh Rate supported by your Monitor. Setting a higher Refresh Rate will reduce the flicker on the screen and any other unstable display issues on the Monitor . Follow the below steps to Change the Refresh Rate in Windows 10
Change Refresh Rate of Monitor in Windows 10
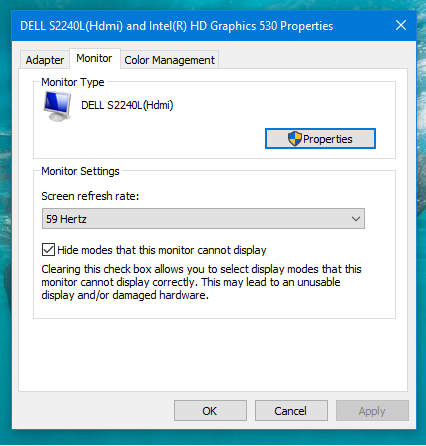
- Access the Refresh Rate Settings: Select Display option form the Control Panel. On the Settings screen Select Advanced Display Settings and then select Display adapter properties option.
- Select Monitor Tab on : On the Adapter Properties Screen, select the Monitor Tab.
- Select the Refresh Rate Values : The Monitor tab will display a drop down list with all the values that the Monitor can support. Windows will by default hide all the modes that the Monitor cannot support. However you can uncheck the Hide modes that this monitor cannot display option to view all the modes. If your Monitor supports a higher refresh rate but it is not set by Windows, you can change it by selecting the appropriate value. Note : Selecting a refresh rate not supported by the Monitor can cause unstable display and can damage your hardware.
- Click Apply and then Ok Button for the changes to take effect. Sometimes you may be required to restart your Computer.
- Select Correct Monitor Connection and Cable: Sometimes you are unable to set a higher refresh rate value even though your Monitor supports it as it is not displayed in the list mentioned above. The Monitor cable that is used to connect the Monitor impacts the Refresh Rate as well. Make sure that you are using cables which support the higher Refresh Rates like for HDMI it is HDMI 1.3 . If your Monitor supports different type of connections, then try connecting your Monitor using a DisplayPort . Use the DisplayPort 1.2 cable which can support higher Refresh rates. Make sure your cables are not loose and plugged in correctly.
- Select Correct Screen Resolution: Apart from cables, Screen Resolution of the Monitor also impacts Refresh Rate. Sometimes the Refresh Rate is supported only by a certain Screen Resolution value. So changing the Screen Resolution will help you select the appropriate Refresh Rate.
- Update Graphics Drivers: Make sure you are using the latest version of the graphics drivers. If not you can download and update the graphics driver from the appropriate manufacturer website.
If you are using the Computer for gaming, then check the game settings as well and set the appropriate refresh rate in the individual game setting. Setting the correct refresh Rate will ensure that you are making optimum use of your Monitor Power.
4K Monitors and Upscaling
A 4k Monitor supports a native screen resolution of 3940 x 2160. It is double the 1920 x 1080 resolution and 4 times the total pixel count. Since it supports a width of around 4000 pixel it is often referred to as 4K Monitor. 4K Monitors support an aspect ratio of 16:9 .The images displayed on a 4k Monitor are more clearer and sharper provided the content is in native 4k. Since the native 4k screen has more pixels it allows storage of more data resulting more detailed, more smoother and natural representation of a picture.4K monitor can be connected to a PC using the standard HDMI 2.0 or DisplayPort Cables.
Using a 4K Monitor for a Computer has its own advantages and disadvantages. The below section point out the pros and cons of using a 4K Computer Monitor
Advantages :
- Higher resolution results in more Desktop space to work on.
- Due to the increased space, you can work comfortably with Multiple applications on a single Desktop.
- More sharper and clearer pictures.
- Suitable for use if you are extensively working on creating or viewing videos or games. Many gaming manufacturers like Samsung and Sony are looking towards using 4K resolution for their gaming consoles.
Disadvantages : For a standard PC user there are some limitations of using a 4K Monitor as mentioned below. You need to understand these limitations before buying your UHD (Ultra High Definition) 4k Monitor.
- The higher the resolution the smaller is the size of the icons and text displayed. The icons and text displayed appears very small on a 4K Screen. You need to change the scaling of the Display to adjust the icon and text size. Certain applications do not support scaling and hence might not be readable on a 4K monitor.
- If you want to make optimum use of the higher resolution you need a good graphics card to support your Monitor. for a powerful graphics card you will have to spend more money.
- The difference in the picture quality can be noticed only if you are viewing from a closer distance or on a larger enough screen.
- The picture quality improves only if the native content is 4K. For content with lower native resolution, 4K Monitors will display the same image as 1080p resolution Display.
You will benefit from a 4k Monitor more if you are creating or working extensively with images, videos or films. With more and more content produce in native 4k, these monitors are soon going to become the Standard as far as Resolution is concerned.
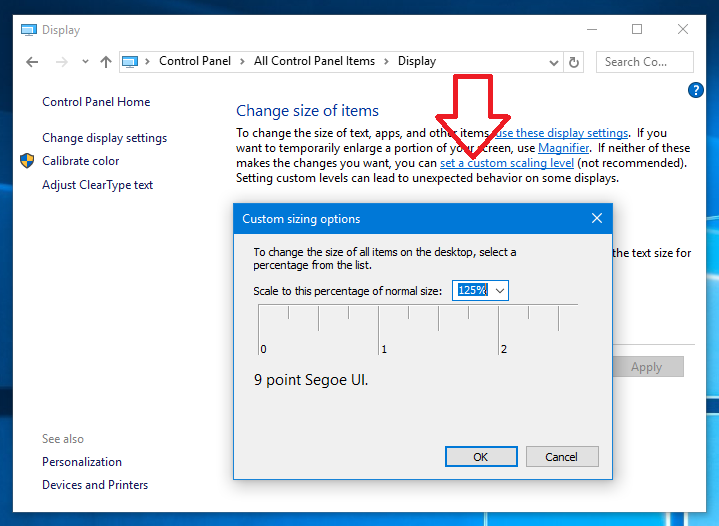
Change Display Scaling in Windows 10
What is Upscaling ?
Upscaling is a process to convert lower resolution image to fit into a 4k resolution by adding the additional pixels to the lower resolution content. Advantages of the 4K monitor can be enjoyed only if you are viewing a 4K native content. When lower Resolution image is used on a 4k monitor, the Monitor will upscale the picture to fit into the 4K resolution. Upscaling just adds the additional pixels to stretch the image to match the number of pixels but does not improve the picture quality of the lower resolution content. Upscaling devices provide backward compatibility and hence are extensively used by devices like Blu-ray players to support 4K or UHD Monitors.
Upscaling does have its own limitation though. Upscaling uses mathematical algorithm to calculate the pixel value by weighing the average of the surrounding pixels. Even if it does improve the quality of the lower resolution image, it can also introduce distortion in the image in the form of blurs, blocks or Halos. Since Upscaling is the only option available to display the lower resolution content at present it will be extensively used till more and more true 4k content is created.
Change Display Scaling
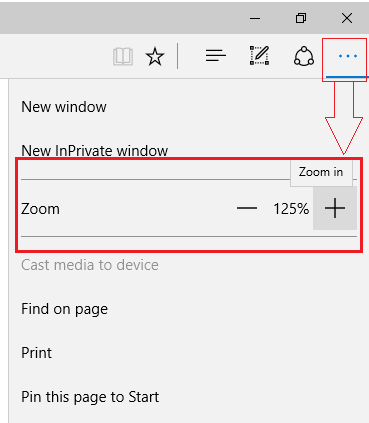
The first thing that you will notice when you connect a 4K Monitor to your Computer is that everything on the Screen appears very tiny. Desktop icons, text size, Menus and most of the GUI elements appear smaller and are hardly readable. To work on a PC comfortably using a 4K monitor you will have to adjust the appearance of the GUI elements by changing the Display Scaling, Windows 10 is one of the best Operating System to respond to Display Scaling changes. Display Scaling in Windows is easy and can be achieved by just configuring the appropriate zoom levels in each application individually or can be controlled globally by setting appropriate scaling percentage.
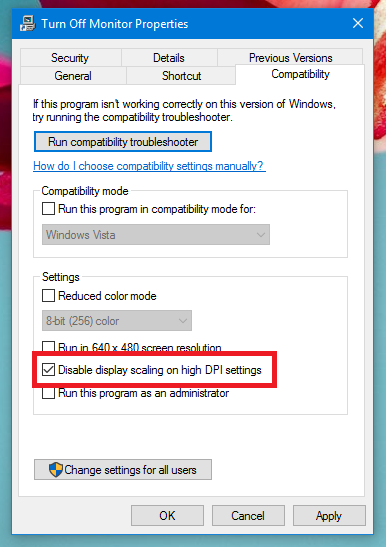
Some applications are not High DPI ready and do not respond very well to Display Scaling changes. Scaling changes introduces image distortion in such applications in the form of blurry fonts and text. You need to individually tweak some settings in Windows as mentioned in steps below which you can follow to improve the image distortion in such applications
- Right Click on the application Shortcut and select the Properties option.
- From the properties Screen , select the Compatibility tab.
- Check the Disable display Scaling on high DPI settings checkbox option.
- Click Apply button and the OK for the changes to take effect.
- Close the application and then restart it.
Option to Disable Display Scaling in Window 10
Most of the display issues should be resolved. If you are using Windows 7 or older version then it is more appropriate to upgrade to Windows 8 or 10 as these versions respond to Display Scaling changes in a much better way.
Working with Multiple Applications in Windows 10
When working with multiple applications at a time, you will feel the need to increase your workspace so that you can view the data comfortably without squeezing the application window. You can double your working space in Windows 10 easily by creating virtual desktops. However if creating virtual desktop is not convenient for you, then Windows 10 provides some hidden features for multiple windows management on a single Desktop. You can arrange the windows side by side using the Snap feature. You can cascade, Tile or Stack the open application windows easily by selecting the appropriate option from the taskbar. Another simple way of increasing you desktop space is simply using a higher resolution Monitor like 4k monitor. Higher the resolution smaller the icons and bigger the screen space. Another Windows 10 Multitasking tip is to use the Windows + the arrow keys to maximise, minimise or rearrange the application windows on your Desktop.
Multiple Window Arrangement Using the Cascade Option from Taskbar
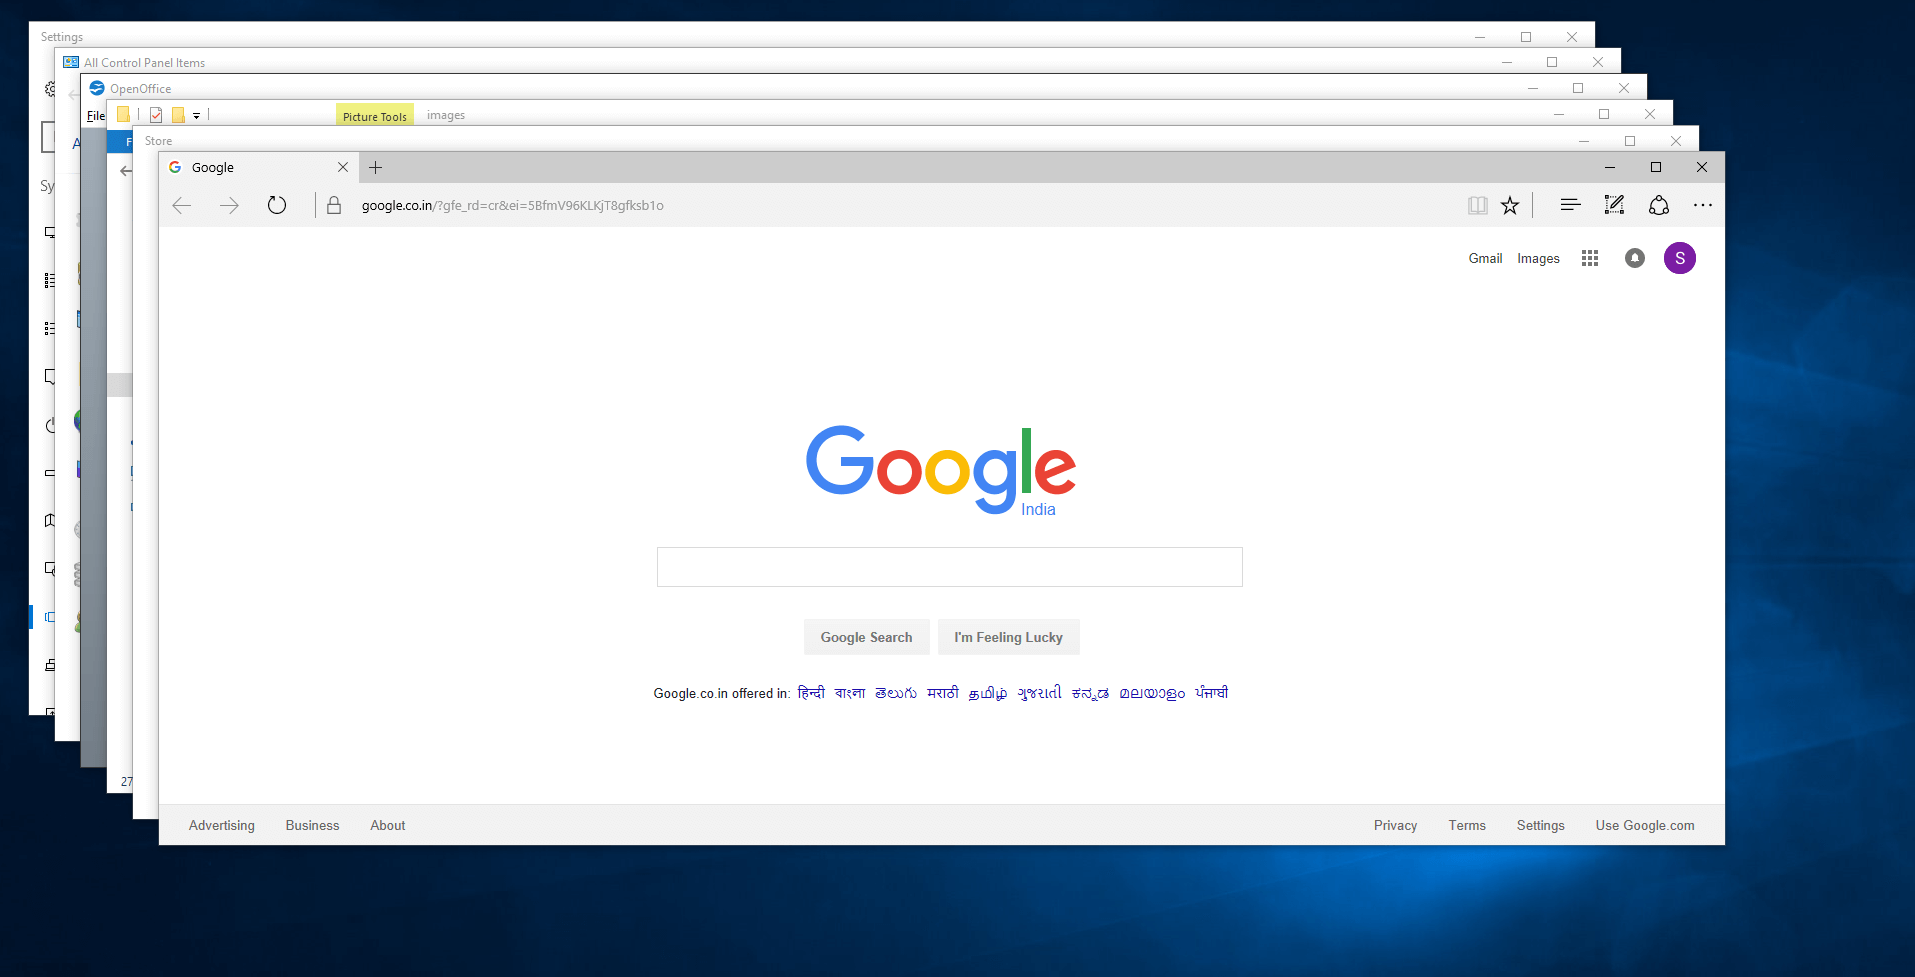
Your can multiply your Screen area in Windows 10 easily using any of these features. However working on Multiple applications requires toggling between the applications. In Windows 10 you can toggle between the application using the Task View option. The Task View option is present on the Taskbar of your Screen. Once you click the Task View button, all the open application windows will be displayed. You can then easily select the application that you want to actively work on. Another way of shifting from one application to another is by using the Alt +Tab key combination. Pressing Alt +Tab will display all the open applications. Pressing the tab key again will bring the focus on the application. Keep pressing the tab key till the focus is on the application that you want to work on and then release the keyboard keys. Create Virtual desktops , Arrange multiple windows on Desktop or toggle between the many applications using Task View, Windows 10 can handle it all with ease and will assist you in being productive while working on Multiple applications.
Tablet Mode for Touchscreen Display
Windows 10 operating system is used on a wide variety of traditional devices like PCs and Laptops as well as modern Touchscreen devices like 2 -in-1 Tablets and even Smartphones. As a part of their Continuum technology, Windows 10 supports 2 desktop modes, the standard PC mode suited for Mouse and keyboard inputs and the other Table Mode for Touchscreen devices. Enabling Tablet Mode in Windows 10 is a intuitive way to interact with your Touchscreen device. You can configure the settings so that you can Auto Switch to tablet Mode when you remove your Tablet from the dock or whenever you Sign In to your device. You can access these setting by accessing the Control Panel->Display ->Table Mode.

Configure the Tablet Mode Behaviour from the Settings Screen
Tablet Mode will basically hide the desktop and the Start menu will expand. The Start menu applications will be displayed in a tile format to make it easy to select using our fingers. Taskbar can be configured to be displayed or hidden as per your settings. Apart from using Tablet mode on your Touchscreen devices you can also activate Table mode on desktop in case required. Tablet Mode feature in Windows provides a uniform UI experience across all the devices operating on Windows10.
Power Management of Monitors
In a Computer setup Monitors are the highest consumers of electricity. Careful Power Management of Monitors can lead you to saving lot of energy or battery life if using a laptop. You can configure Power management settings which allow Monitors to enter a low power consumption mode during the period of inactivity .There are various tricks and tips that you can follow to optimise the energy consumed by your Display.
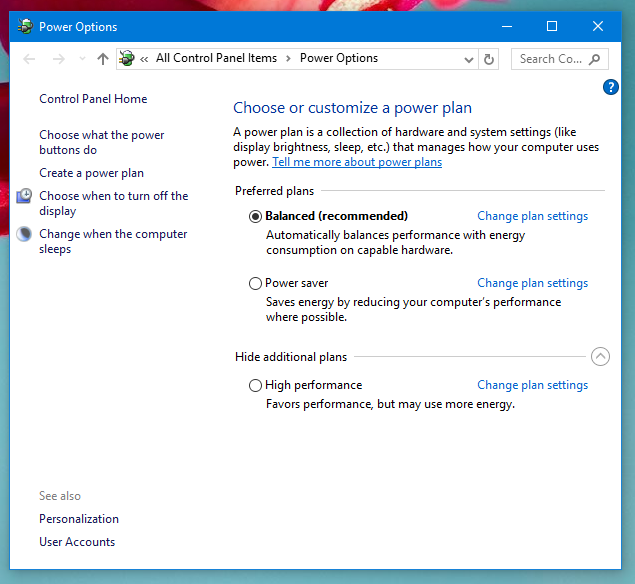
Setting up a appropriate Power Plan for your Monitor is one of the foremost and the simplest of options. Windows provides predefined Power Plans to choose from. The energy consumption and performance parameters are tweaked to make it more suitable for different purposes or scenarios. You can manually choose the Power Plans or change the Power Settings in Windows 10 of your active Power Plan as per your needs. While The Power Saver Plan reduces the performance where possible to save energy, Balanced Power Plan balances both power and performance and is the one that is recommended and default option selected by Windows. High performance option should be used only in scenarios where you performance takes precedence as it does little to save energy. You can use High performance option if you want to prevent computer from sleeping automatically by selecting ‘Never’ option from the Turn Off After and Sleep drop down list provided.
Choose appropriate Power Plan in Windows 10 to Save Energy
Based on the Power Plan that you select, Windows by default configures two parameters namely Monitor Turn Off time to auto Switch Off the Monitor after a certain duration of inactivity and Computer Sleep time to put Computer to Sleep if the Computer remains idle for that time. You can change the values of both these parameters as required. The range of values for time interval is from 1 minute to 5 hours. Once the Monitor is Turned Off you can Turn it On by any providing any user input like a Mouse click or by pressing a Keyboard Key. Similarly you can also wake Computer from sleep by pressing any keyboard Key.
Windows also provides an option to Create your own Power Plan. Select Power Options from the Control Panel and then select the Create power plan option on the Screen. The Create power plan option allows you to take your existing plan as a base and then you can customize it and save it using your specific name. Apart from changing the Monitor Turn Off time, Windows allows you to configure other parameters to optimize the power consumption as well as System performance.
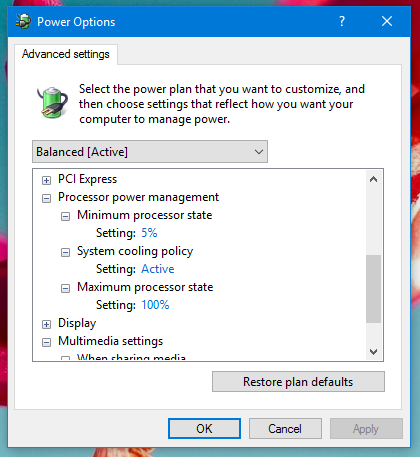
Adjust Power Plan Settings to Manage How your Computer Uses Power
You can configure when you want the hard disk power to be turned off, Processor Power management, USB settings for each Power plan to adjust how you want to your computer to manage power. These options are present in the Change Advanced Power Settings option from the Power Plan Screen. You can also configure what happens when you hit the Power button or the sleep button situated on your Computer cabinet which will be applicable to all the Power plans. Apart from saving your energy bills there are many other benefits of Turning Off Monitor that will help you to maintain your Computer setup and help you to extend the life of your devices.
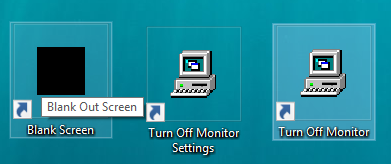
Different ways of Turning Off Monitor To Save Energy
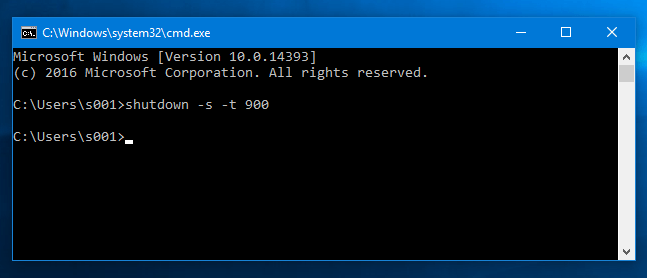
You can Turn Off your Monitor manually or by configuring a Monitor Turn Off time in the active Power Plan and is the simplest way of saving energy. Based on the time interval configured the Monitor will Turn Off automatically if computer remains idle for that much time. However setting the Computer idle time for the Monitor to Switch off has some drawbacks. If the time interval set is short enough it will interfere in you work and the Monitor will keep Turning Off or if the time interval is too long then it will seldom provide the energy benefits that you want to achieve. So there needs to be a way to instantly Turn Off your Monitor when you want to. Well, you can do that by pressing the hardware button that is present on the Monitor. But what about the Laptop ? Laptop do not have this hardware button and you cannot Turn Off Laptop Screen using any external button. Another drawback is when having a Multi Monitor setup you do not want to manually go and search the hardware button and Switch off the Monitor of each Computer connected. Switching On the Monitor will also require you to Switch On the connected Monitors manually again, individually for each Monitor. Turn off Monitor Software is a specialised software that can be used to resolve all these issues and one of the best ways to Power Off your Monitor. You can Turn Off Monitor on Windows 10 using different options provided along with other features offered by the Turn Off Monitor Software to Power manage your Computer.
Turn Off Monitor Software
You can now take control of managing the power consumption of your Desktop Monitor or laptop and Switch Off your Monitor instantly when required instead of depending on the default power setting to come into action. Turn Off Monitor is a free to try utility and works on Windows Operating System like Windows 10, Windows 8.1 Windows 8 and older Windows version like Windows 7 and Vista. The trial version of the utility has the full functionality and limits the usage only.
Download Turn Off Monitor Software
Turn Off Monitor Software also supports turning Off Multiple Monitors in a multi Monitor setup. In case you monitor cannot be Turned Off due to some technical difficulties, then Turn Off Monitor allows you to display a Blank screen instead. Displaying a Blank screen will stop the glare emitted by the Monitor and can also be useful as a security measure so that no one can see your data while you are away. With Turn Off Monitor you can Power Off your Screen not only when computer remains idle but also when you are performing background tasks like downloading a huge file, listening to music or running a virus scan. Turning Off your Display Screen becomes more critical when using devices like laptop that run on battery. Turning Off the laptop Screen when not required will not only save energy but can also help extend the battery life of a Laptop.
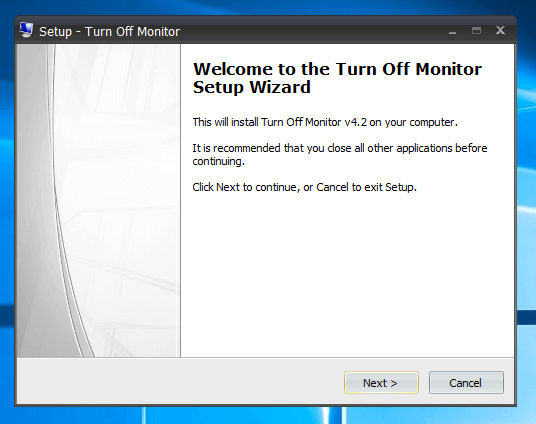
Apart from Turning Off the Monitor, the Software provides many other features like auto Shutdown a Computer, Restart a Computer, Lock a Screen, Start a screensaver etc. which help you to efficiently manage the power consumption of your computer. The section below explains the various features of Turn Off Monitor and how it can help you to save on your energy bills and be productive. Download the Turn Off Monitor Utility now and you can explore all these features for free. Turn Off Monitor Software comes with a standard Windows Setup. To Install the Software all you need to do is to follow the steps of the installation wizard . You can register your copy of this Software by paying a minimal fees of $5 only.
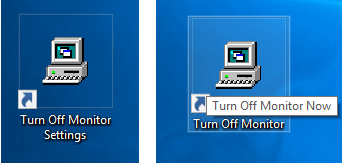
Create Shortcuts to Turn Off Monitor
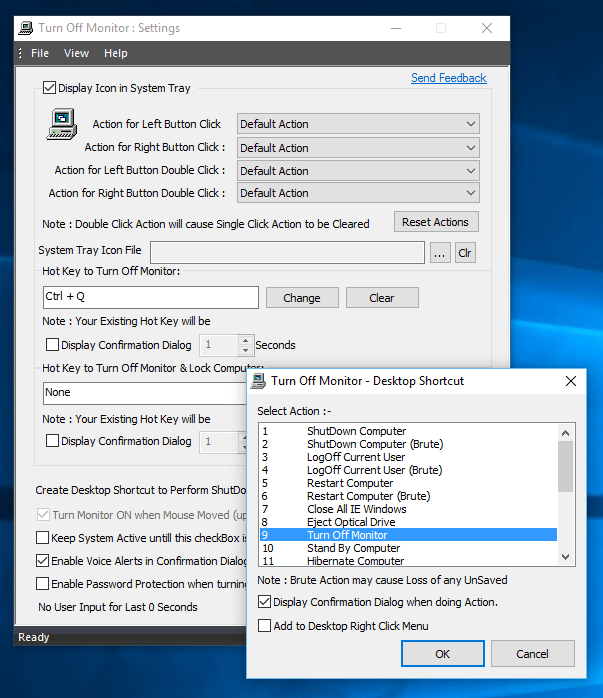
Turn Off Monitor software allows you to create shortcuts using which you can Switch Off Your Display Screen with ease. Mentioned below are the different types of shortcuts that you can create using Turn Off Monitor Software to Power Off your Screen. To activate your Screen you just need to provide any kind of user input like moving the cursor or pressing a keyboard key or providing a touch in case a Touchscreen device.
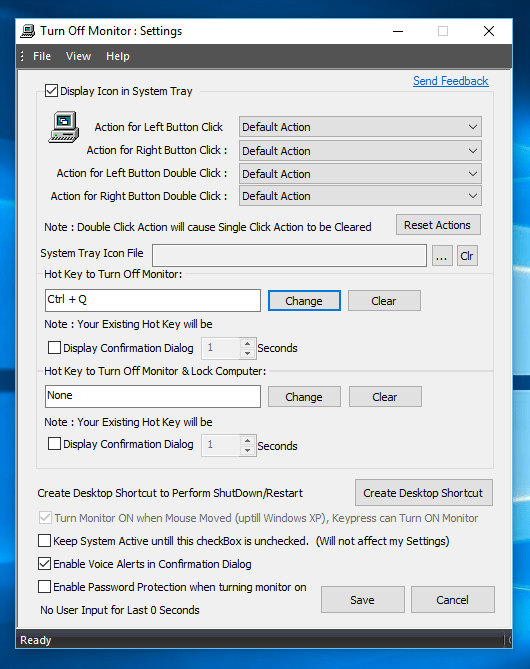
- Turn Off Monitor using a Keyboard Shortcut: Turn off Monitor software allows you to define a Keyboard Shortcut or Hotkey to Turn Off your Monitor. Click on the Turn Off Monitor Settings shortcut created on the desktop by the Turn Off Monitor installation wizard to invoke the Settings screen and enter any key e.g. F7 or any other key like Ctrl + A which you want to define. Save the changes and that’s it. Next time you press that defined key or the key combination, your Monitor will be Switched Off.
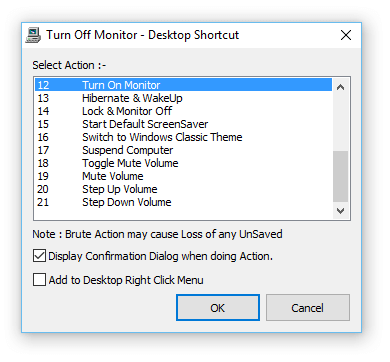
- Desktop Shortcut to Turn Off Monitor: Creating desktop shortcut is now easy using Turn Off Monitor Software. You can create Desktop shortcut for Powering Off the Monitor and also for various other functions like Shutdown computer, Lock and then Turn Off Monitor, Restart the computer etc. You just need to select the appropriate action from the list provided and the shortcut will be created. You can also optionally configure if there you want to prompt a voice confirmation before the action takes place.
- Turn Off Monitor from Taskbar: You can easily drag and drop the Turn Off Monitor shortcut created on the Desktop to the taskbar. Creating a Turn Off Monitor shortcut in the Taskbar help you to easily launch the application without minimising any screen or searching for the shortcut on the clustered Desktop.
- Add Turn Off Monitor to Notification Menu: Turn Off Monitor utility by default creates a option in the Notification area on the bottom right of the Screen. You can click on the icon and Turn Off the Monitor. Right Clicking on the icon displays a list of all the power management options provided by the Turn Off Monitor utility.
Turn Off Monitor of a Windows 10 Computer
- If you are working with many applications there will be lots of shortcuts created on your desktop and finding the right shortcut on a clustered desktop takes sometime. The Turn Off Monitor utility allows you to add the Turn off Monitor option to your Desktop right click menu. Adding it to this menu, you don’t have to search for the shortcut and will save your valuable time.
Using any of the methods above you can easily launch the Turn off Monitor application without spending any time to search for the location where the application is installed.You can Turn Off the Monitor quickly and save on your energy bills.
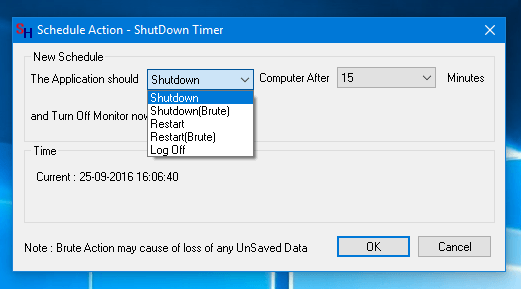
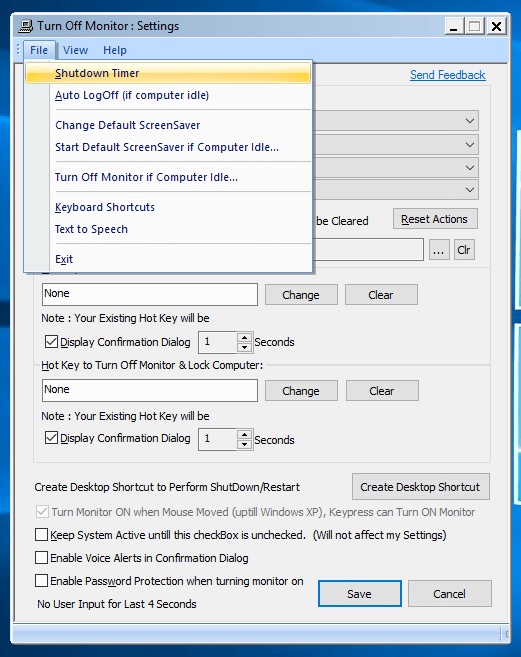
Automate Tasks using Turn Off Monitor Utility
Apart from Turning off the Monitor instantaneously, Turn Off Monitor also allows you to define a certain time to auto Switch Off the Monitor. This is essential if you work for late hours and generally forget to Turn Off your Monitor manually when leaving your workspace. This feature can be very useful in a office environment to ensure that the Computers Screens are turned Off if they remain idle for a defined time. Turning Off Monitors in a network environment can collectively can significantly save power and money.You can define the duration after which the Monitor will be Turned Off or you can define idle time of the Computer as a trigger to Switch Off the Display Screen. You can also schedule Monitor Turn Off and Turn On time to automate the activity on daily basis using the Turn Off Monitor Software.
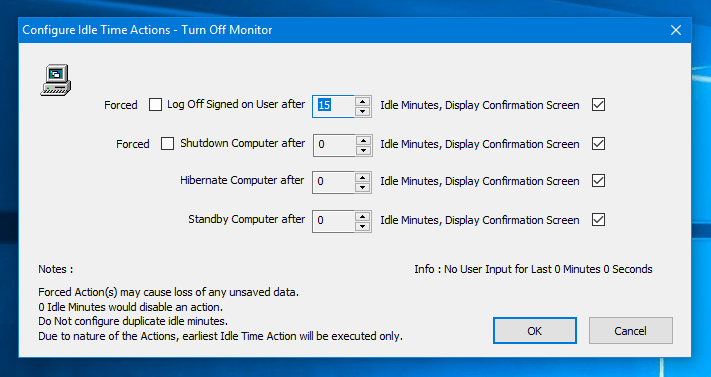
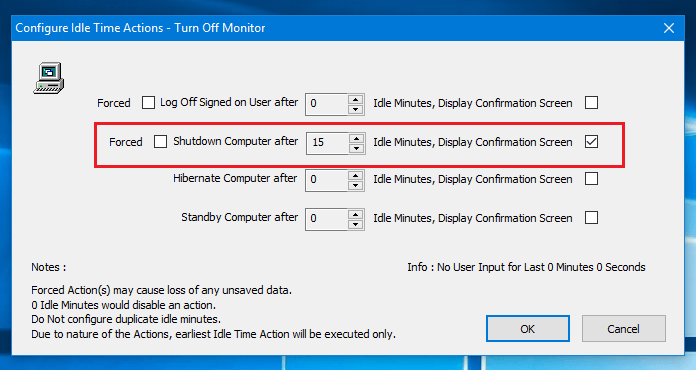
Configure Idle Time Actions Screen of Turn Off Monitor
Apart from Switching Off the Monitor , you use the Turn Off Monitor Utility to automate various other daily activities that will help you to minimise the power consumption of your Computer as well. You can Auto Shutdown your windows computer if the computer remains idle for a certain duration. Using this feature will make sure that your computer is not kept running all night without any purpose. You can also configure a voice confirmation message to alert the user before the Computer is Shutdown. In case you are not able to shutdown your machine due to some critical work or if you are working remotely it makes sense to at least Power Off your Monitor. Similarly you can automate the task to Restart the computer after a certain duration, put the computer in Hibernation State or put the computer in a Standby Mode. You can also forcefully shutdown the Computer or log off the current User, however you need to be careful as doing so you will loose all the unsaved data. You can use all or any of these options and make sure that energy is utilised only when it is required and not wasted just because you have forgotten to perform the action manually.
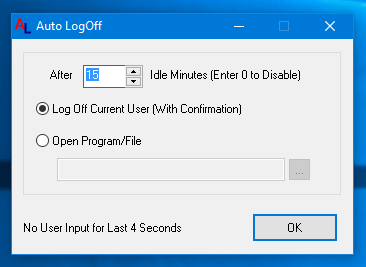
Secure your Workstation by Using Turn Off Monitor Utility
How many times has it happened that you unintentionally forgot to lock your workstation due to an urgent call from home or office? Leaving the Monitor On without locking is a potential threat to your computer as well as the your data and information that it holds. Using Turn Off Monitor Software you can make sure that your data is safe by selecting to Lock and Turn off Monitor or using the Auto LogOff Current User feature. When the Lock and Turn Off Monitor option is selected the Turn Off Monitor will Lock your workstation and then Turn Off your Screen. The Log On Screen will be displayed when you provide any user input to activate the Monitor. By logging off the user or locking the screen you can make sure that no one can access your computer or data while you are away from your desk.
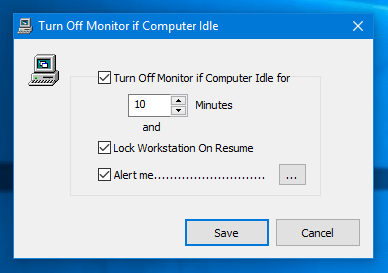
Screen to Configure Turn Off Monitor Action if Computer Idle
The user will be logged off automatically provided he has no unsaved data on his Desktop. There is also a Auto Log Off (Brute) option supported which will forcibly Sign Off the user. Be careful while using the brute option as it will not save an unsaved data. You can also optionally select to configure a voice alert message so that you are aware when the action is happening. You can easily set the log off after time to 0 if you want to disable the functionality.
Power Saving Vs Screensavers
Screensavers displaying the flashy animated graphics on your Screen are slowly but surely becoming a thing of past . Screensavers were initially introduced to solve the burn-in issues caused by continuously displaying an image on the CRT Monitor. Graphical elements that do not change like the taskbar would get burnt in the Screen and its ghost image would appear even when the Screen is Switched Off. This could potentially damage the Screen and hence the name ”Screensaver” which would help “save” the CRT Monitors “Screen” from damage.
However with the advancement of technology, nowadays flat panel LCD Monitors are being used. LCD monitor uses a different Display technology and will never have the “burn in” problem. So are Screensavers required ? Screensavers are technically not required on LCD displays. They no longer provide any power savings but on contrary utilise more power. Screensavers are graphics intensive and tend to use a lot of 3D animation which can add load on your graphics hardware to produce complicated 3D images which in turn increases the Power Consumption of your computer and puts them in a mode which is equivalent to gaming. Even if the screensaver is simple or basic, it keeps the Monitor On, and thus there is no saving electricity. Screensavers can cause more loss to laptops since they will utilise more battery life instead of saving it.
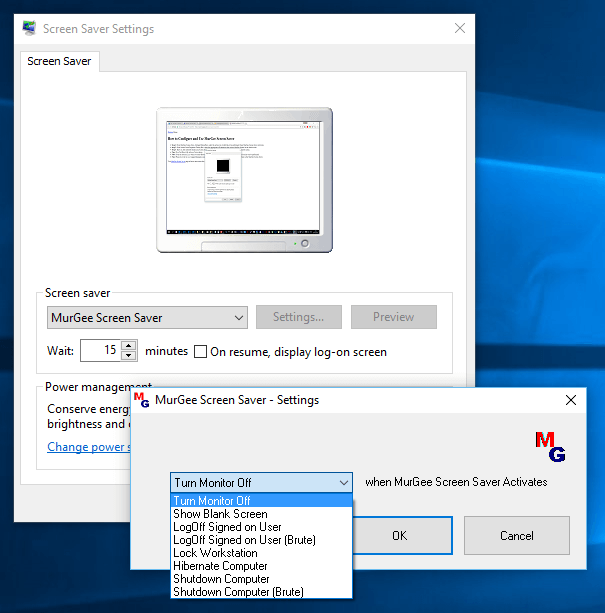
Screensaver to Turn Off Monitor
However, some people just love screensavers as they can be a bit creative and utilise their photographs or family photographs and display it as a slideshow of the Screensaver. So the best way you can use your Screensaver and still save power is to use a Screensaver to Turn Off Monitor when you are not actively using the System. You can save a lot of energy and battery life if you are using a laptop. You can also configure the screensaver in such a way to display your favourite pictures for a certain period before Turning Off the Screen. You can also make sure that you Lock the screen before it Turn Off so that your computer and data remains safe.
Avoid setting up of Screensavers as much as possible and create a Desktop shortcut to Turn Off Monitor wherever and whenever possible instead. You can still configure a Screensaver in Windows 10 at your own risk and if power consumption and electricity bills do not worry you.
Monitor Battery life of laptop using Powercfg Command
Powercfg is a command line tool provided by Windows to analyse the various Power settings of your Laptop as well as your Desktop Computer. Using Powercfg you can now understand the current state of your Laptop battery and how your Computer manages Power. Powercfg uses the command line parameter batteryreport to generate a report on the Power consumption of your battery, its capacity and the way it had decreased over the time. It can generate report in HTML format which can be handy while optimizing the Laptop Power usage.
The powercfg requires administrative rights to run the command. To open the command prompt in administrative mode use the Windows key + X combination and the select the command prompt (admin) option. Below are some of the commands that are used frequently and help you analyze the energy consumption as well as understand the gaps where your Computer is not correctly configured.
- Powercfg /a to view Sleep Modes: One of the Most important commands this will provide you with the detail information of Sleep states of your Computer. Contrary to the general conception, Computer does not go into Sleep state immediately. There are different levels of sleep mode (S0-S6) and each state is activated as per the configuration.
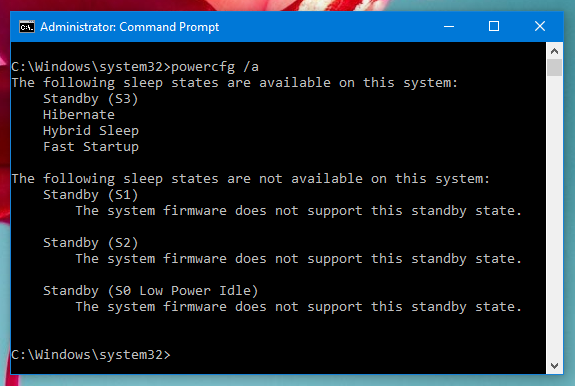
Powercfg Command in Windows to View the Configured Sleep States of the Computer
- Powercfg / devicequery wake_armed: You can Switch On your Monitor or activate your Computer from Sleep state by providing any kind of user input like moving a Mouse or pressing any Keyboard key. You can view which devices are configured to wake up your computer using this command. You can use this information to analyze if there is any mysterious application or device which is providing input to the Monitor or computer and waking it up.
- Powercfg /energy to produce HTML report : This command will analyse the way the Power is utilised by your Desktop Computer and produce a HTML report with all the details. The report is divided into error (highlighted in red colour), warnings (highlighted in yellow colour) and information (plain black an white text). Analysing this report will give you a complete understanding of how efficiently Power is managed by your Computer.

Energy Report Created by Powercfg Command in Windows used to Analyse Power Consumption of Computer.
- Powercfg /l List all Power Plans : This option will list all the power plans supported by the System. The active or the current plan is highlighted using a start (*) symbol.
- Powercfg / Import : This will allow the user to import power settings from a specified file. The full path of file that was created using the Powercfg /export command is required to execute this command.
You can generate various reports to analyse and find gaps in your computer power utilisation. If your analysis points increase in Monitor Power consumption, then configuring a keyboard shortcut to Turn Off Monitor can be helpful. You can also use these report for troubleshooting and finding the cause of some mysterious behaviour of your System. Based on your analysis and findings you can fine tune the Turn Off Monitor timings, Sleep modes or schedule automated Shutdown actions to optimize power consumption of your Computer.
Monitor management is full of different techniques and evolves everyday. Monitor and PC management requires re-evaluation as the newer technologies come into action and upgrading the current energy efficiency or performance measurements and methods is required. By understanding and keeping a constant attention to all the features of the Monitor mentioned you can mitigate any increase of energy requirements of Monitors and Computers that will go a long way to help you manage your Monitor(s) effectively.